
AED Pad Placement
AED pad placement sounds like a minor detail right up until you are the person standing over someone who has collapsed, holding the pads, and everyone else is looking at you. In that moment, even the most basic questions can create a freeze: upper right or upper left? What if the person is a child? What if the chest is wet from the heat? The answers are printed on the pads themselves, but familiarity with the basics before an emergency means you spend less time reading and more time acting.
In El Paso, the person most likely to hold those pads first is not a nurse or a paramedic — it is whoever happened to be nearby. That could be a civilian employee at Fort Bliss, a student at UTEP, a coach at an El Paso ISD campus, or a worker at a distribution facility in the Lower Valley. Knowing the placement in outline form closes the gap between freezing and acting, and that gap matters when EMS is eight to ten minutes out.
Correct pad placement affects how well the AED can read the heart rhythm and deliver a shock if one is advised. Pads in the right positions, on bare dry skin, allow the device to do its job. The rest is following the sequence, and the AED handles the guidance from there.
If you want the full CPR-AED sequence to feel familiar before you need it, the AHA BLS CPR class includes hands-on practice with actual AED trainers — not just a description of where the pads go.
Upcoming CPR Class Dates and Times
AED Pad Placement for Adults
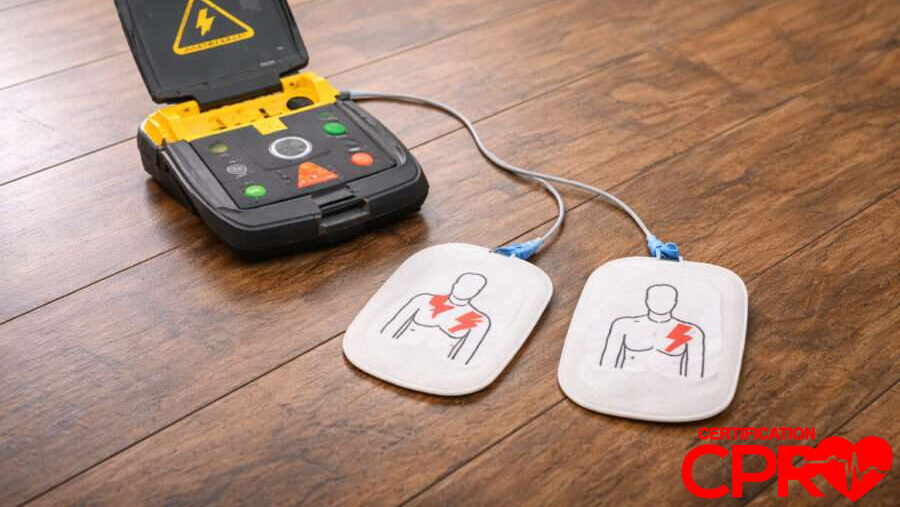
For an adult, the placement is straightforward. One pad goes on the upper right side of the bare chest, just below the collarbone. The other goes on the lower left side of the chest, a little below the armpit. That arrangement creates the electrical path the AED is designed to use, running the current through the heart from one side to the other.
Expose the chest before applying the pads — clothing blocks the skin contact the device needs. If the chest is wet from sweat or heat (a realistic scenario during El Paso summers), wipe it down quickly before pressing the pads on. You are not looking for perfect conditions, just good contact. The pads themselves have clear diagrams showing placement; use those diagrams as your primary guide.
For most adult rescues: upper right chest, lower left chest, pressed firmly on dry bare skin. Let the AED take over the analysis from there.
AED Pad Placement for Children (Ages 1–8)
For children ages 1 to 8, placement depends on the child’s size and the pads available. If the AED has child pads or a child mode, use them and follow the device instructions. The placement may still follow the standard upper-right/lower-left layout if the pads fit on the front of the chest without touching each other. If the child is small enough that both pads would overlap or meet in the middle, the AED instructions may call for a front-and-back setup instead — one pad on the chest, one on the back.
The key rule is that pads must not touch or overlap. A smaller body requires a moment to check the diagrams before pressing the pads down. Hands-on practice — even a single class session — makes that moment far shorter and calmer when it counts.
AED Pad Placement for Infants (Under 1 Year)
On most infants, front-and-back positioning is the correct setup: one pad centered on the chest, the other on the center of the back. Use that layout because the infant’s body is too small for both pads to sit side-by-side on the chest without touching — and pads that touch cannot deliver the current through the heart as intended. Use infant- or child-specific pads when they are available, and follow the AED instructions throughout.
The pad diagrams and AED voice prompts do not disappear just because the patient is small. Let them guide you, place the pads where instructed, and keep the response moving.
What If Pads Touch or Overlap?
Overlapping pads need to be corrected before the AED analyzes or delivers a shock. When pads touch, they create a short-circuit path along the skin surface rather than through the heart — this causes the AED to misread body resistance and may prevent an effective shock from reaching the myocardium at all. When pads touch, the delivery is compromised. This is most common with children and infants, where the chest is narrower. The fix is not to force the standard adult layout onto a body that cannot accommodate it — the fix is to use the alternative placement the AED instructions show for smaller patients, typically front-and-back positioning. Do not spend time overthinking it; check the diagram, make the adjustment, and move on.
For the full sequence covering what happens after pad placement — analysis, shock delivery, and when to resume CPR — the step-by-step AED guide covers how those steps connect.
Special Situations
Medication patches. Remove the patch and wipe the skin before placing the pad. Medication patches interfere with pad contact and can cause burns at the placement site.
Pacemakers and implanted defibrillators. Using the AED is still appropriate. If you can see or feel an implanted device under the skin, position the pad slightly to the side rather than directly over it.
Thick chest hair. Chest hair is usually not a problem, but if it prevents the pad from adhering to the skin, shave the area quickly if a razor is immediately available in the AED kit.
Wet skin. Wipe the chest dry before applying pads. If the person is in standing water, move them to a dry surface first. In El Paso’s heat, sweat is common — a quick wipe is all that is needed.
Pregnancy. Use the AED. Apply adult pads and do not hesitate. The shock will not harm the fetus, and not using the device when the person is in cardiac arrest has far worse consequences.
Jewelry and piercings. Removal is not required. Avoid placing the pad directly over a metal piercing or piece of jewelry; shift placement slightly if needed, then continue.